Faking a Data Provider with Python
QGIS data providers are written in C++, however it is possible to simulate a data provider in Python using a memory layer and some code to interface with your data.
Why would you want to do this? Typically you should use the QGIS data providers, but here are some reasons why you may want to give it a go:
- There is no QGIS data provider
- The generic access available through OGR doesn’t provide all the features you need
- You have no desire to write a provider in C++
- No one will write a C++ provider for you, for any amount of money
If you go this route you are essentially creating a bridge that connects QGIS and your data store, be it flat file, database, or some other binary format. If Python can “talk” to your data store, you can write a pseudo-provider.
To illustrate the concept, we’ll create a provider for CSV files that allows you
to create a layer and have full editing capabilities using QGIS and the Python
csv module.
The provider will:
- Create a memory layer from a CSV file
- Create fields in the layer based on integer, float, or string values in the CSV
- Write changes back to the CSV file
- Require the CSV file to have an X and Y field
- Support only Point geometries
We’ll use the cities.shp file that comes with the PyQGIS Programmer’s Guide to create a CSV using ogr2ogr:
ogr2ogr -lco "GEOMETRY=AS_XY" -f CSV cities.csv ~/Downloads/pyqgis_data/cities.shpThis gives us a CSV file with point geometry fields.
Here’s the header (first row) and a couple of rows from the file:
    X,Y,NAME,COUNTRY,POPULATION,CAPITAL
    33.086040496826172,68.963546752929688,Murmansk,Russia,468000,N
    40.646160125732422,64.520668029785156,Arkhangelsk,Russia,416000,N
    30.453327178955078,59.951889038085938,Saint Petersburg,Russia,5825000,N
Signals and Slots
We’ll look at the code in a moment, but here is the general flow and connection of signals from the layer to slots (methods) in our provider:
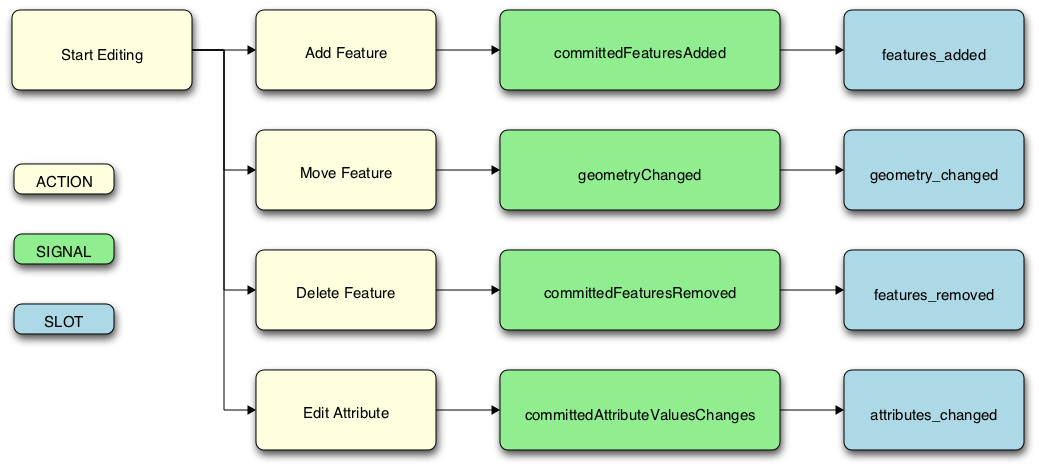
These are all the connections we need (signal -> slot) to implement editing of both geometries and attributes for the layer.
The Plugin Code
The plugin is pretty simple; when the tool is clicked, it opens a dialog allowing you to select a CSV file, then uses the CsvLayer class to read the file, create the memory layer, make connections (signals -> slots), and add it to the QGIS canvas.
The run Method
Here’s the run method from the plugin (csv_provider.py):
|
|
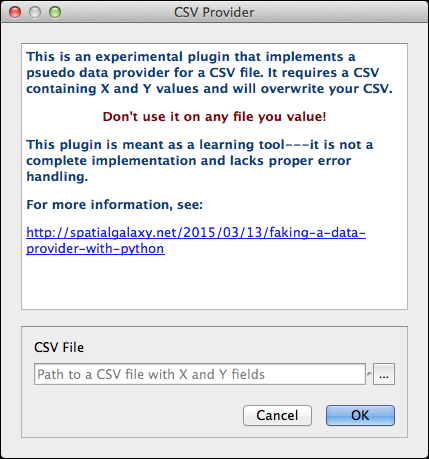
The dialog (csv_provider_dialog.py) contains an intimidating warning and allows you to select a CSV file to load (lines 4-6).
Line 9 gets the path of the selected file from the dialog and line 10 creates the layer using the selected file. From that point on, you interact with the layer using the regular QGIS editing tools. We need to keep a reference to the layer (self.csvlayer), otherwise all our connections get garbage collected and we lose the “link” to the CSV file.
The CsvLayer Class
The CsvLayer class manages the creation, loading, and editing of the CSV file. First let’s look at the methods in csv_layer.py that create the layer from our CSV file.
Creating the Layer from the CSV
The __init__ method examines the header and a sample row to determine the names and field types to be created in the layer. To read the CSV file, we use the csv module.
Here’s the __init__ method:
|
|
Once the CSV file is opened, the header is read in line 8, and a sample of the first row is read in line 11.
Line 12 creates a dict that maps the field names from the header to the corresponding values in the sample row.
Line 16-25 look at each sample value and determine if its type: integer, real, or string.
Lines 28-30 create the URI needed to create the memory layer, which is done in line 34.
The add_records method is called to read the CSV and add the features in line 35.
Lastly we make the connections needed to support editing of the attribute table and the CSV file in response to the actions in our Signal/Slot diagram (lines 40-45).
Here is the add_records method that reads the CSV and creates a corresponding feature in the newly created memory layer:
|
|
Each row in the CSV file is read and both the attributes and geometry for the feature are created and added to the layer.
Managing Changes
With the layer loaded and the connections made, we can edit the CSV using the regular QGIS editing tools. Here is the code for the connections that make this happen:
|
|
The dirty flag is used to indicate that the CSV file needs to be updated.
Since the format doesn’t support random access to individual rows, we rewrite
the entire file each time an update is needed. This happens in the editing_stopped method.
When attributes are changed and/or removed, the only action taken is to set the dirty flag to True.
When there is a geometry change for a feature, it is updated in the attribute
table immediately to keep the X and Y values in sync with the feature’s
coordinates. This happens in the geometry_changed method.
You can view the full code for both the CsvLayer class and the plugin on GitHub or by installing the plugin. To install the plugin, you’ll need to make sure you have the Show also experimental plugins checkbox ticked in the Plugin Manager settings. To help you find it, the plugin is listed as CSV Provider in the Plugin Manager.
Looking Further
A few things about this implementation:
- It is an example, not a robust implementation
- It lacks proper error handling
- There is no help file
- It could be extended to support other geometry types in CSV
- In its current form, it may not work for other CSV files, depending on how they are formatted (take a look at the Add Delimited Text Layer dialog in QGIS to see what I mean)
- If you want to enhance this for fun or profit—well for fun, fork the repository and give me some pull requests
A couple of final points:
- Going this route can be a lot more work than using an existing data provider
- This method can be (and has been) used successfully to interface with a data store for which there is no data provider